
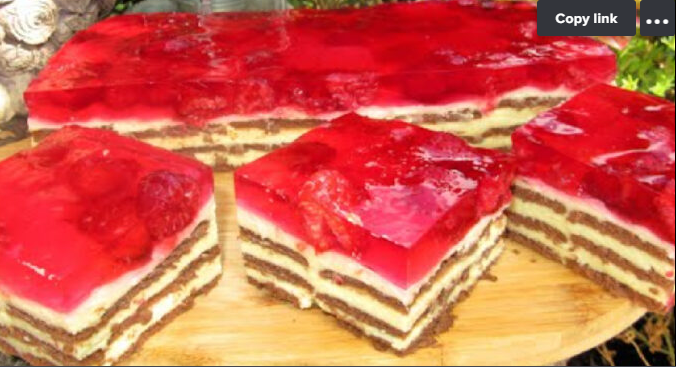
If you are craving a delicious sweet treat but do not have time to bake, this easy recipe is exactly what you need. Featuring three layers of crisp chocolate biscuits, a smooth vanilla cottage cheese (tvaroh) cream, and fresh raspberries set in red cake jelly, this no-bake cake is guaranteed to be a success!
Why You Will Love This Recipe
-
100% No-Bake: Quick and simple to assemble without turning on the oven.
-
Rich Layered Structure: Generous cocoa biscuit layers filled with creamy, smooth cottage cheese cream.
-
Vibrant Berry Topping: Sweet raspberries combined with clear red cake jelly create a bakery-worthy presentation.
-
Crowd-Pleasing: Perfect for weekend coffee breaks, family gatherings, or holiday treats.
Ingredients
Cottage Cheese Cream (Tvaroh Filling)
-
Smooth Cottage Cheese / Quark (Tvaroh): 1 kg (2.2 lbs)
-
Unsalted Butter: 200 g
-
Sugar: ¾ cup
-
Eggs: 3 large
-
Milk: 1 cup (250 ml)
-
Vanilla or Cream Pudding Powder: 2 packets
Biscuit Base & Layers
-
Cocoa Biscuits: 3 packages (approx. 600 g total)
Fruit & Jelly Topping
-
Fresh Raspberries: 300 g
-
Red Cake Jelly (Dortové želé): 2 packets
-
Boiling Water: 750 ml
Step-by-Step Instructions
1. Prepare the Cottage Cheese Cream
-
In a small bowl, whisk the 2 pudding powders into the milk until completely smooth and free of lumps.
-
In a saucepan over low heat, gently melt the butter and sugar together until the sugar is dissolved.
-
Add the cottage cheese (tvaroh) and eggs into the melted butter mixture, stirring constantly until fully combined and smooth.
-
Stir in the milk and pudding mixture and cook gently while stirring until thick and creamy. Remove from heat and allow to cool slightly.
2. Assemble the Biscuit & Cream Layers
-
First Layer: Arrange a single layer of cocoa biscuits across the bottom of your baking pan or dish. Spread a portion of the warm cottage cheese cream evenly over the biscuits.
-
Second Layer: Place a second layer of cocoa biscuits over the cream and spread another layer of cream smoothly on top.
-
Third Layer: Lay down the final layer of cocoa biscuits and cover with the remaining cottage cheese cream, smoothing the top evenly.
-
Chill: Place the assembled cake in the refrigerator to cool and allow the cream to firm up.
3. Top with Raspberries and Jelly
-
Arrange the raspberries evenly across the top of the chilled cake.
-
Dissolve the 2 packets of red cake jelly in 750 ml of boiling water according to package directions, then let it cool slightly.
-
Once the jelly begins to cool and thicken slightly, pour it gently over the raspberries.
-
Refrigerate until the jelly layer is completely set before slicing and serving.
Preparation Breakdown
| Phase | Duration |
| Prep Time | 20 minutes |
| Cook Time (Cream & Jelly) | 10 minutes |
| Chilling Time | 3 to 4 hours |
| Total Time | ~4 hours |
Frequently Asked Questions
Can I use frozen raspberries?
Yes! If using frozen raspberries, thaw them gently and pat off excess moisture with a paper towel before placing them on the cake so the jelly sets properly.
How do I store leftovers?
Keep the cake covered in the refrigerator. It stays fresh, moist, and soft for up to 4 days. The cocoa biscuits will soften nicely into a cake-like texture as it sits.
Conclusion
This No-Bake Layered Raspberry & Cottage Cheese Cake is proof that simple, no-bake recipes can yield extraordinary results. With its velvety cream, chocolate biscuit base, and bright jelly finish, it is a foolproof dessert that everyone will love!